
Do It Yourself (DIY)
Fixing a Loose or Noisy Door Hinge: Step-by-Step Instructions
May
Introduction:
A loose or noisy door hinge can be a frustrating issue that affects the functionality and aesthetics of your doors. Fortunately, with a few simple tools and some basic DIY skills, you can easily fix this problem yourself. In this step-by-step guide, we’ll walk you through the process of fixing a loose or noisy door hinge, ensuring smooth operation and restoring peace and quiet to your home.
Materials Needed:
Screwdriver (Phillips or flathead, depending on the hinge screws)
Wooden toothpicks or wooden matchsticks
Carpenter’s glue or wood filler
Hammer (if using wooden matchsticks)
Sandpaper (if using wood filler)
Step 1: Inspect the Hinge:
Start by examining the hinge to identify whether it is loose or if there are any visible signs of wear or damage. A loose hinge may have screws that have become loose over time, while a noisy hinge may indicate that the components need lubrication.
Step 2: Tighten Loose Screws:
Using a screwdriver that matches the type of screws on your hinge (Phillips or flathead), tighten all the screws on the hinge. Start with the loosest ones and work your way around the hinge, ensuring each screw is securely tightened. This step alone may resolve the issue if the hinge was simply loose.
Step 3: Reinforce Loose Screw Holes:
If tightening the screws didn’t solve the problem, it’s likely that the screw holes have become worn or stripped over time. To fix this, remove the loose screws from the hinge.
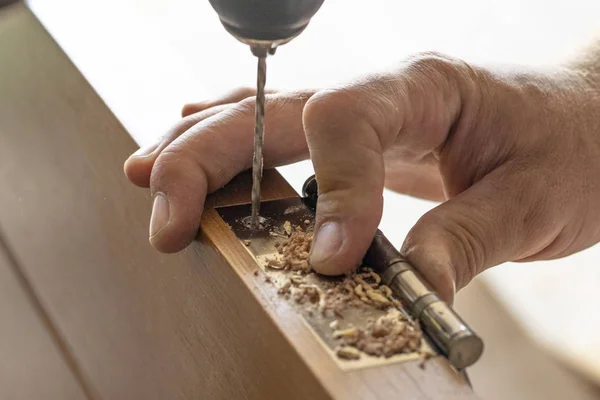
Step 4: Toothpick or Wooden Matchstick Method:
Take some wooden toothpicks or wooden matchsticks and dip the ends in carpenter’s glue. Insert the glue-coated ends of the toothpicks or matchsticks into the screw holes in the door frame, breaking them off flush with the surface. The wooden pieces will provide additional material for the screws to grip onto, reinforcing the hinge.
Step 5: Wood Filler Method:
Alternatively, you can use wood filler to repair the screw holes. Apply a small amount of wood filler to a putty knife and press it into the damaged screw holes. Smooth out the surface and allow the wood filler to dry according to the manufacturer’s instructions. Once dry, sand the surface of the wood filler until it is flush with the door frame.
Step 6: Reattach the Hinge:
Once the toothpicks, matchsticks, or wood filler have dried and hardened, align the hinge with the screw holes and reinsert the screws. Carefully tighten the screws using the screwdriver until they are snug but avoid over-tightening, as it may strip the holes again.
Step 7: Lubricate the Hinge (if necessary):
If your hinge was noisy, apply a small amount of lubricant (such as silicone spray or graphite powder) to the moving parts of the hinge. Open and close the door several times to distribute the lubricant evenly.
Conclusion:
Fixing a loose or noisy door hinge is a DIY (do it yourself) task that can be easily accomplished with a few basic tools and materials. By following these step-by-step instructions, you can ensure that your doors operate smoothly and silently. Remember, regular maintenance and occasional tightening of hinges will help prevent future issues, ensuring your doors function properly for years to come.